My first job was as a failure analysis engineer in the hard disc drive manufacturing industry many years ago. I had to troubleshoot electronics circuits on the printed circuit board assembly (PCBA) on a functional level where the product was receiving instructions to execute certain functions. The functions can be moving the actuator head from a particular track to another track, Test Instruments reading and writing data from the hard discs, or data processing for back and forth communications between the hard disc controller and the PC host adapter.
Once you have narrowed the troubleshooting down to a component failure, this stage is called the component level failure analysis. Analyzing a component failure can be quite tedious and there are many types of components on a PCBA. For example, there are discrete components such as electrolytic capacitors, ceramic capacitors, tantalum capacitors, diodes, inductors, crystal oscillators, microcontrollers, power driver integrating circuits (IC), protocol interface ICs, and more. In addition, there will almost always be an electrical level verification in a component level failure analysis before going deeper into decapsulation or cross-sectioning level verification of a component.
With many types of failures and types of components on a PCBA, failure analysis is certainly not a trivial job or process. Many people write their thesis and white papers on failure analysis. It is a profession for many people I know in the electronics industry. Reading the papers and talking to failure analysis engineers, you can determine that functional level failure analysis is typically analyzed using a power supply, a logic analyzer, an oscilloscope, and a Test Instruments digital multimeter.
You can have firmware or software errors or hardware component errors in a product failure. In this blog, I will exclude the system firmware or software errors and instead focus on the hardware component errors. Hardware component errors can come from:
- Designing errors where the failed component is functioning at the limits or over the limits of its specification.
- Manufacturing process errors where the failed components are inadvertently electrically overstressed, incorrectly installed (wrong polarity), or damaged.
- During the incoming screening process, there is also the possibility that a batch of poor-quality components slipping.
In the following paragraphs, we will explore some practical examples of bench test instruments for failure analysis.
Using a digital multimeter for discrete component verification
A digital multimeter (DMM) is one of the most versatile test instruments to do initial discrete component verification. The reason is that it measures resistance, voltage, current, capacitance, and it can even do a diode test. Discrete components are typically very tough, but sometimes manufacturing processes such as pick and place can potentially damage them, causing slight cracks at the components’ edge.
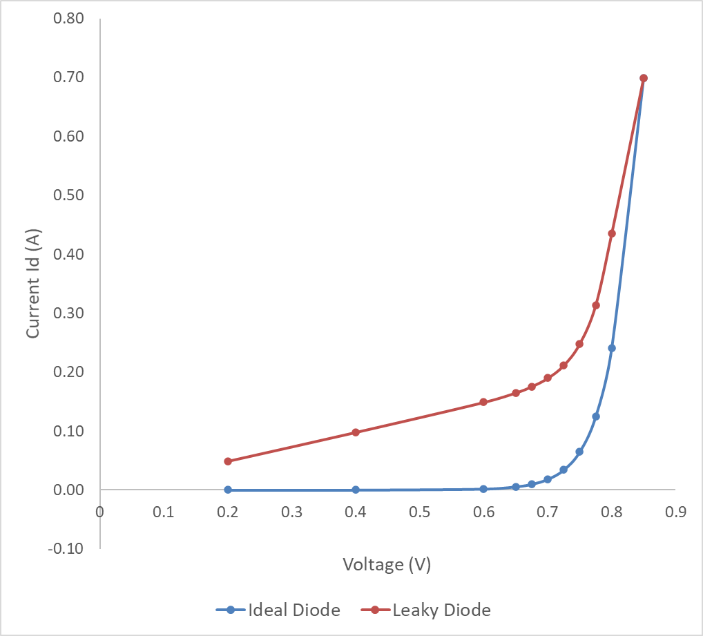
If the damage is severe, the component will become an open circuit. Some components, like diodes, can become a “leaky” diode if overstressed. Figure 1 shows a current-voltage (IV) curve of a good diode and a “leaky” diode as if there is a parasitic resistor across the diode.
Figure 1. An IV-curve of a good diode and a defective “leaky” diode
For troubleshooting purposes, you do not need an expensive IV-curve tracer. A DMM will do the job by using the diode test or resistance measurement mode.
Using a DC power supply and an oscilloscope for system-level verification
Many electronic devices, especially when they have electric motor drivers, need a separate 12 V line from a 5 V line that supplies the general circuit board. In failure analysis, there are occasions where you may encounter electronic devices unable to power up properly, or in the worst-case scenario, a power IC latch-up occurred. This failure can be caused by a product design problem induced by an external overvoltage supply or a component problem.
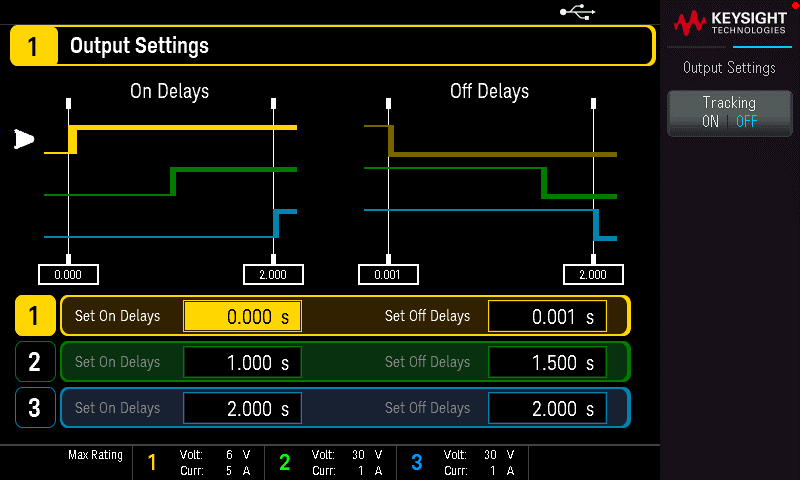
A modern DC power supply can help you power up multiple DC sources in various timing sequences. Using Keysight’s EDU36311A DC power supply, you can programmatically power up multiple DC sources in various power-up timing sequences to verify the product robustness (Figure 2).
Figure 2. Example of power-up sequence settings in a Keysight EDU36311A DC power supply
When coupled with an oscilloscope, you can monitor in-rush currents, noise on the power rails, and even monitor power fluctuations by setting minimum or maximum trigger levels.
Using a Function generator and an oscilloscope for system-level verification
A function generator is a very useful test signal generator that can source many basic waveforms such as sine, square, ramp, pulse, triangle, and even any kind of arbitrary waveforms. You can use these waveforms to stimulate your device under test and an oscilloscope can then be used to measure and Test Instruments analyze the response.
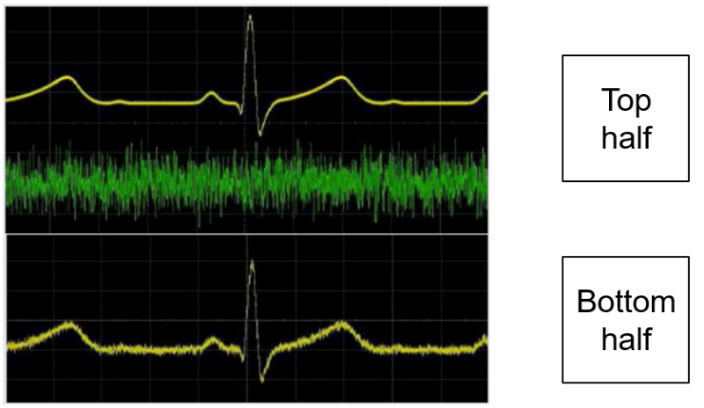
You can even use a function generator to add noise or spike signals into your test signals to simulate the potential cause of a product failure. The top half of Figure 3 shows an oscilloscope measurement of an ECG signal, and a random noise signal produced by a function generator. These two signals are added together to show the resultant noisy ECG signal at the bottom half of Figure 3.
Figure 3. A simulated ECG signal added with a noise signal to test the robustness of medical devices
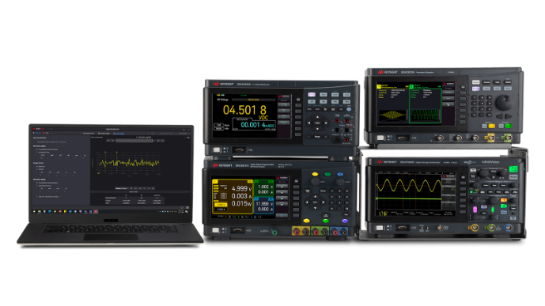
Keysight’s Smart Bench Essentials Series for your troubleshooting needs
Keysight Smart Bench Essentials Series is a complete portfolio of a general-purpose bench test system with one unifying, powerful PC graphical interface. You can purchase the system as a bundle or per solution. Smart Bench Essentials Series consists of the following:
- EDU36311A triple-output DC power supply
- EDU34450A 5digit digital multimeter
- EDU33211A / EDU33212A single and dual-channel function generator
- EDUX1052A/G 50 MHz, dual-channel oscilloscope
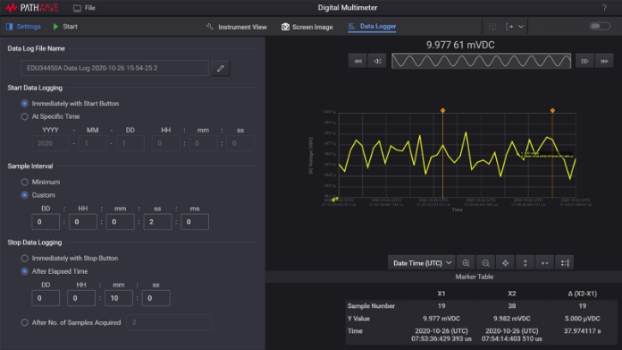
The powerful Keysight PathWave BenchVue application software allows you to control and view all your instruments and display test results on a single monitor, enabling you to troubleshoot and debug your products productively. With PathWave BenchVue application software, you can capture data, take screenshots, visibility to system states, visualize and analyze measurements with just a few clicks. You can also compare past results to develop measurement insights. You can then finalize your project reports quickly by leveraging industry-standard data export formats (Figure 4).
Figure 4. PathWave BenchVue application software performing data logging
Every Smart Bench Essentials solution (Figure 5) comes with KeysightCare service and support — giving you access to a comprehensive support database, expert technical advisors, and proactive support notifications when you register your product.
Figure 5. Keysight Smart Bench Essentials Series and PathWave BenchVue application software

The post Troubleshooting with Your Bench Test Instruments appeared first on ELE Times.
No comments:
Post a Comment